> ## Documentation Index
> Fetch the complete documentation index at: https://docs.quick.bot/llms.txt
> Use this file to discover all available pages before exploring further.
# WooCommerce
The **WooCommerce integration block** allows you to connect your QuickBot to a WooCommerce store and
search for products directly within your chat flows. This enables you to create interactive shopping
experiences, product recommendations, and automated customer support with real-time product data.
***
## General
This block integrates with the WooCommerce REST API to provide product search functionality. After
authentication, you can search for products by name and display formatted results with prices,
links, and detailed information to enhance user engagement.
***
## Prerequisites
Before configuring the WooCommerce block, ensure your WooCommerce store is properly set up:
### 1. Enable REST API
1. Navigate to **WooCommerce > Settings > Advanced > REST API** in your WordPress dashboard.
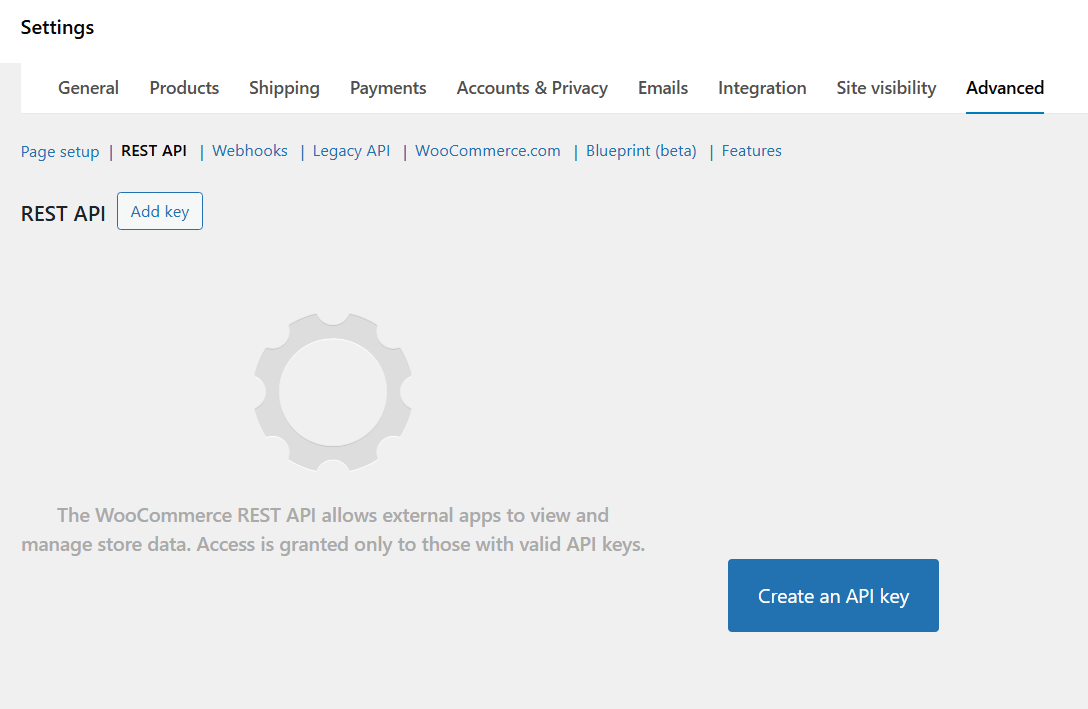 2. Click **Create an API Key** to create new API credentials.
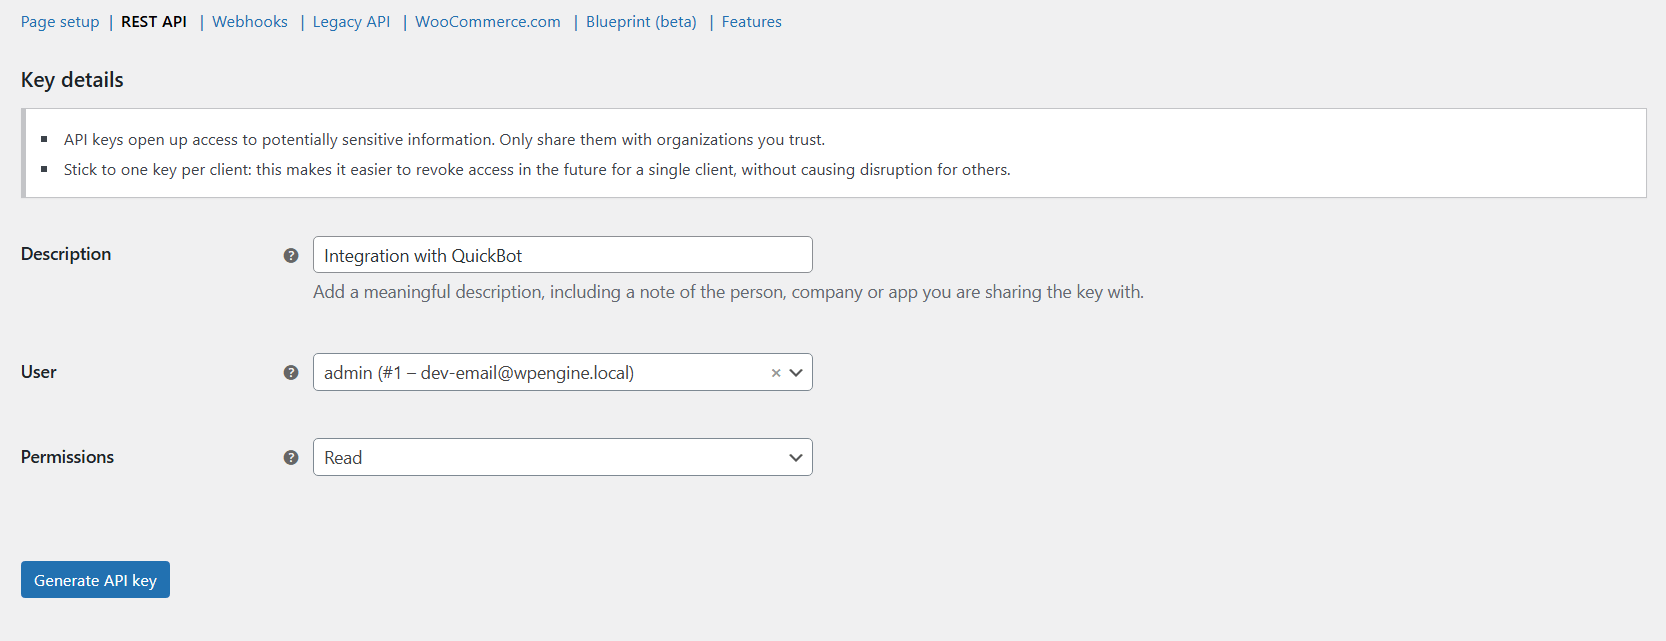
3. Configure the API key settings:
* **Description**: Give it a descriptive name (e.g., "QuickBot Integration")
* **User**: Select a user with appropriate permissions
* **Permissions**: Select **Read**
2. Click **Create an API Key** to create new API credentials.
3. Configure the API key settings:
* **Description**: Give it a descriptive name (e.g., "QuickBot Integration")
* **User**: Select a user with appropriate permissions
* **Permissions**: Select **Read**
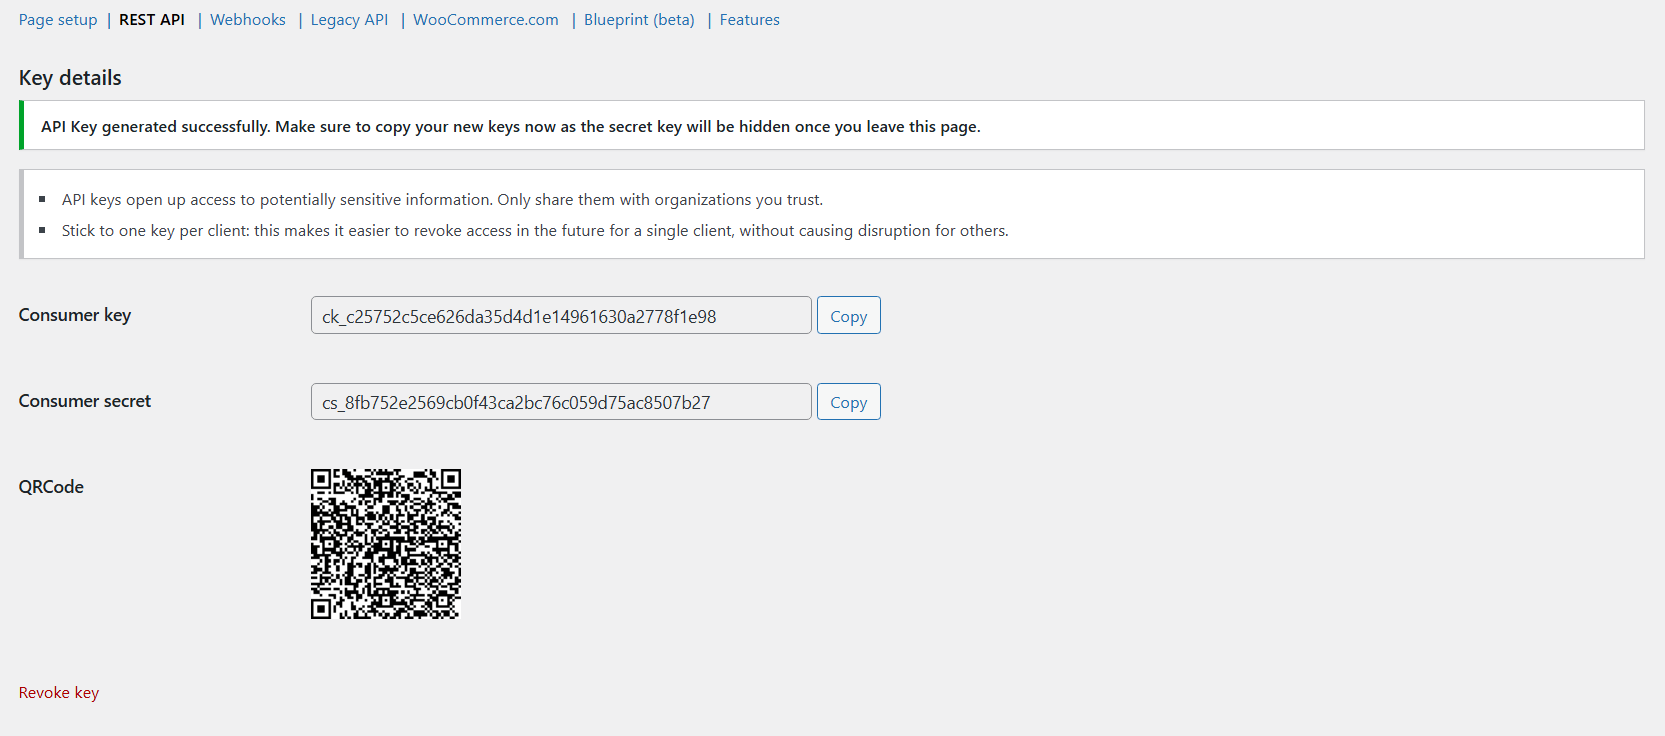
 4. After creating the API key, copy the following credentials for later use:
* **Consumer Key**
* **Consumer Secret**
* **Site URL** (your WordPress site URL)
4. After creating the API key, copy the following credentials for later use:
* **Consumer Key**
* **Consumer Secret**
* **Site URL** (your WordPress site URL)
 ***
## Configuring the WooCommerce Block
1. Grab the WooCommerce block from integrations, and drop into the flow.
***
## Configuring the WooCommerce Block
1. Grab the WooCommerce block from integrations, and drop into the flow.
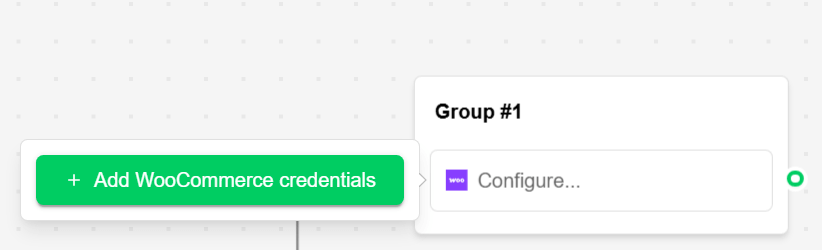
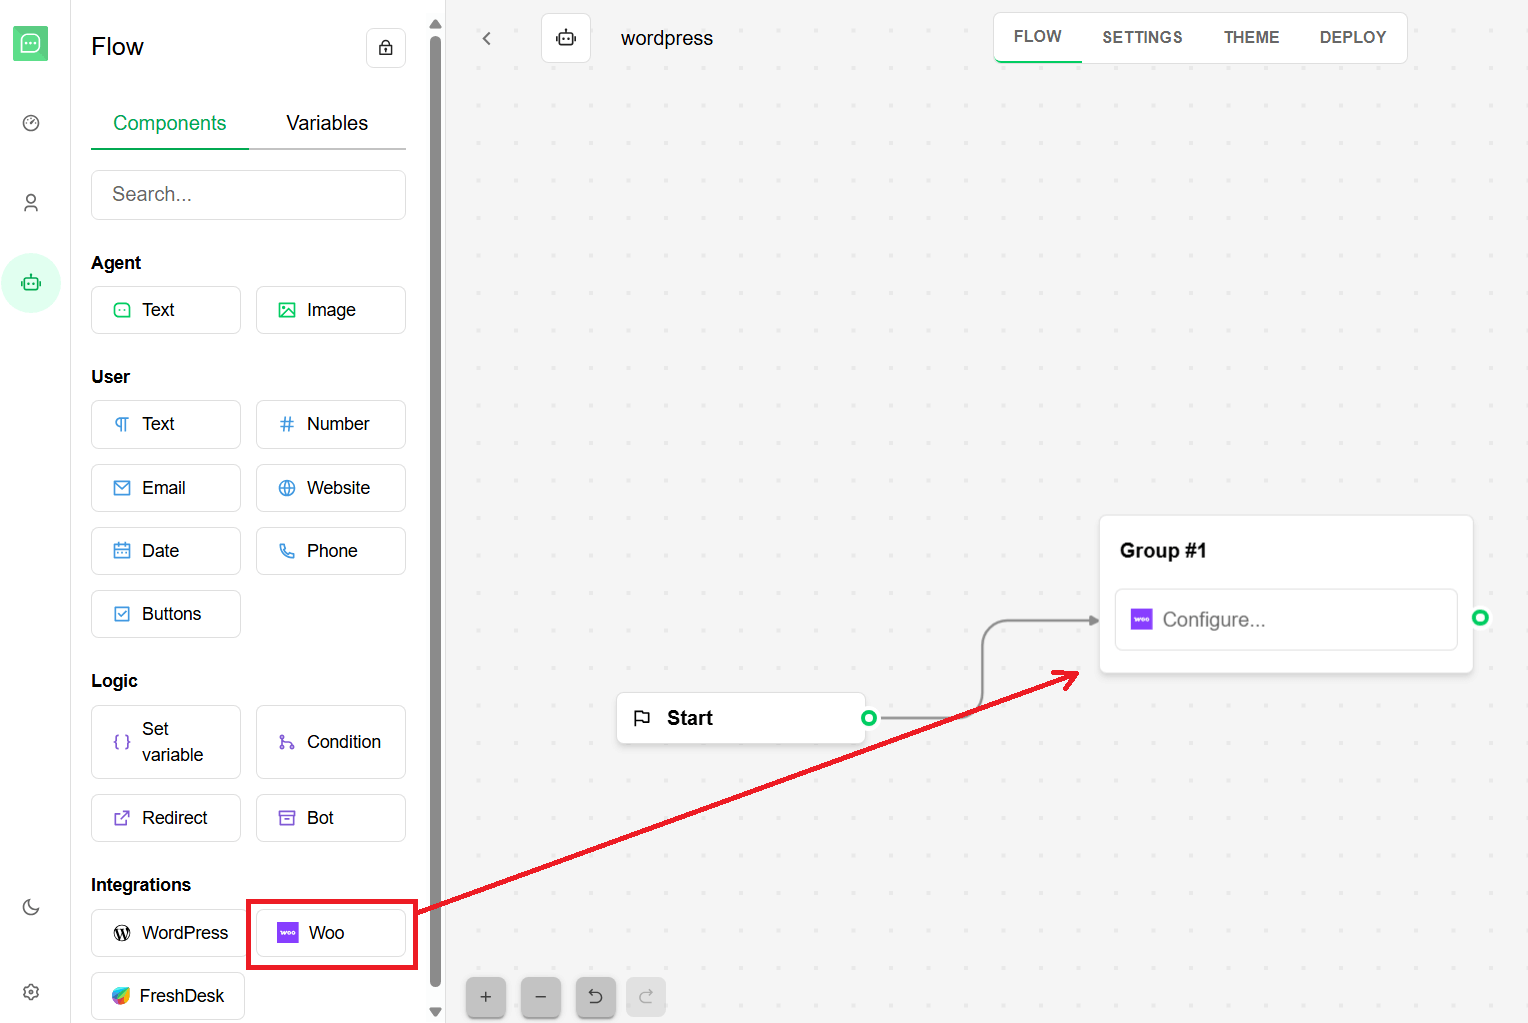 2. In the WooCommerce block, click **Add WooCommerce credentials** button.
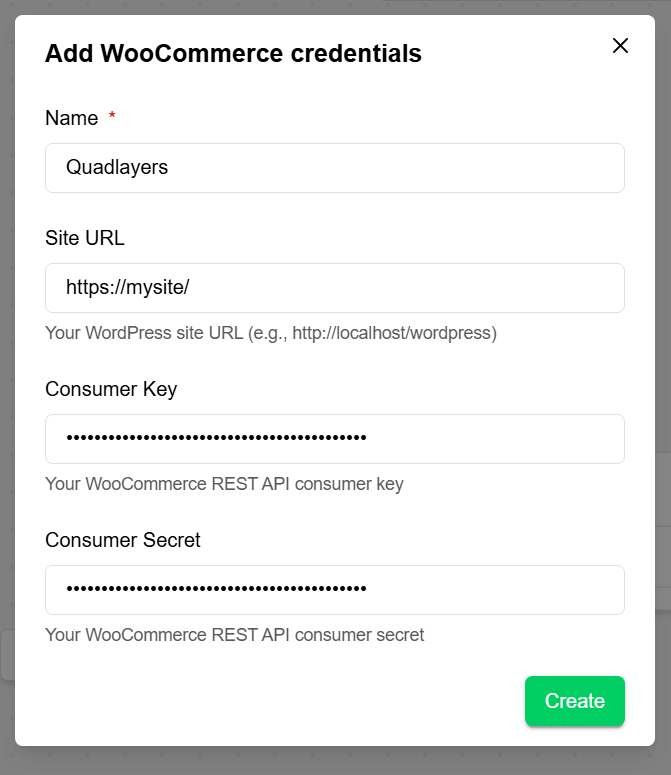
 3. Fill in the fields using the credentials generated earlier, then click **Create**.
 ***
## Setting Up Variables
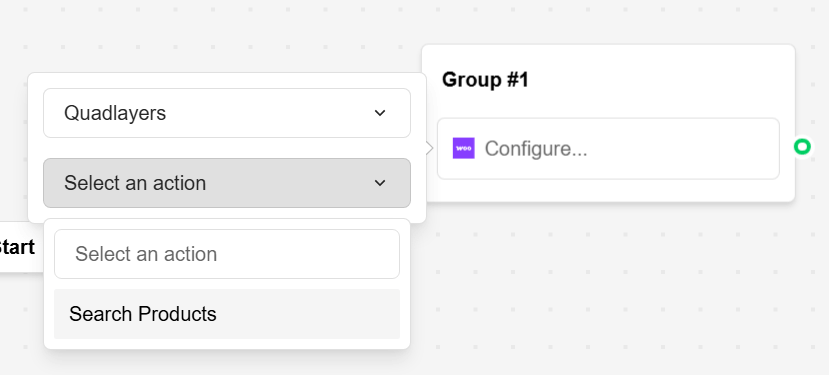
Done with the authentication. Click on WooCommerce Block, then **Select an action** and select
**Search Products**
***
## Setting Up Variables
Done with the authentication. Click on WooCommerce Block, then **Select an action** and select
**Search Products**
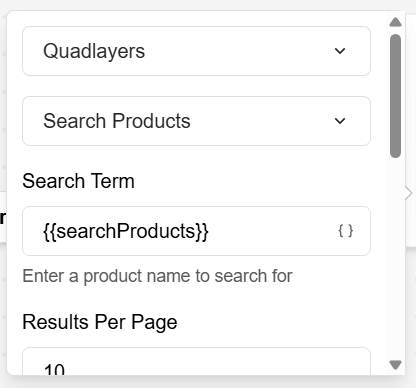
 Create a new variable for the search functionality, such as **productSearch** and assign it in
Search Term selector
Create a new variable for the search functionality, such as **productSearch** and assign it in
Search Term selector
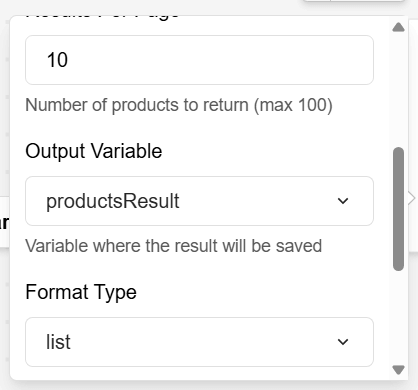
 Create a another variables for the result of the search, **productsResult**. Assign it in the Output
Variable selector.
Create a another variables for the result of the search, **productsResult**. Assign it in the Output
Variable selector.
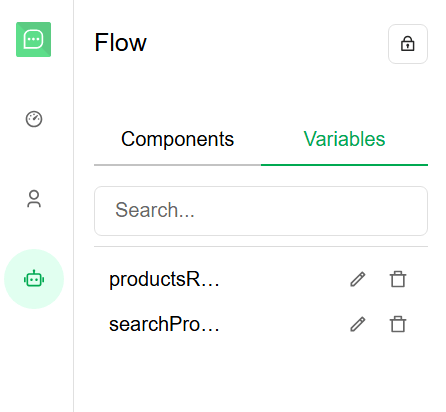
 You can check your variables created in the flow editor sidebar, at Variables tab.
 ***
## Using the variables into the flow
Now with our variables created for our WordPress block, you can start using it into the flow.
1. Add a **text input component** from the **User section** in the Flow sidebar into the group. This
input will allow the user to search products .
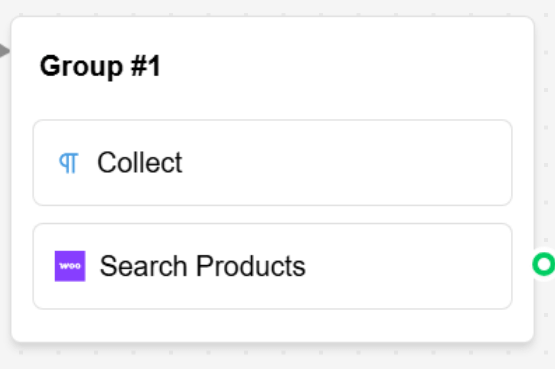
Important: the Input component must be loaded before the WordPress block. To ensure this, either:
a. Place the input components above the WordPress block within the same group, or
***
## Using the variables into the flow
Now with our variables created for our WordPress block, you can start using it into the flow.
1. Add a **text input component** from the **User section** in the Flow sidebar into the group. This
input will allow the user to search products .
Important: the Input component must be loaded before the WordPress block. To ensure this, either:
a. Place the input components above the WordPress block within the same group, or
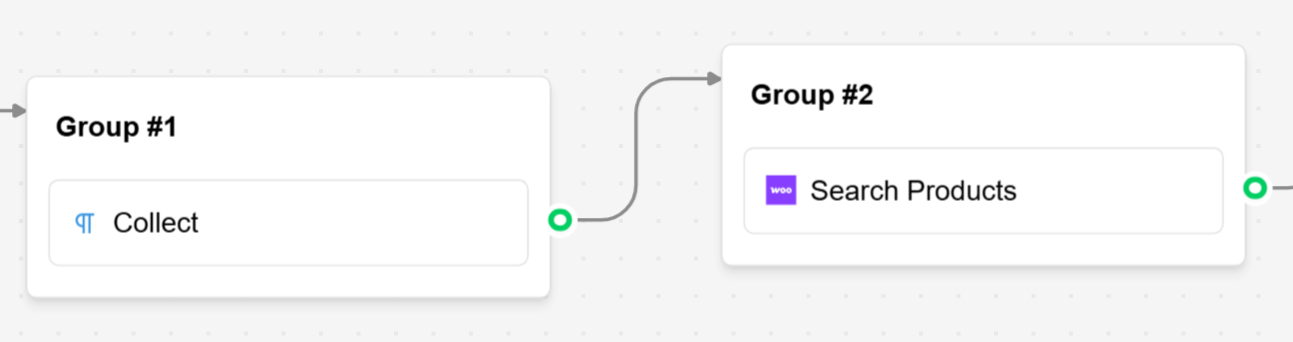
 b. Create a flow that first loads a group with the input components, and then a second group that
loads the WordPress block.
b. Create a flow that first loads a group with the input components, and then a second group that
loads the WordPress block.
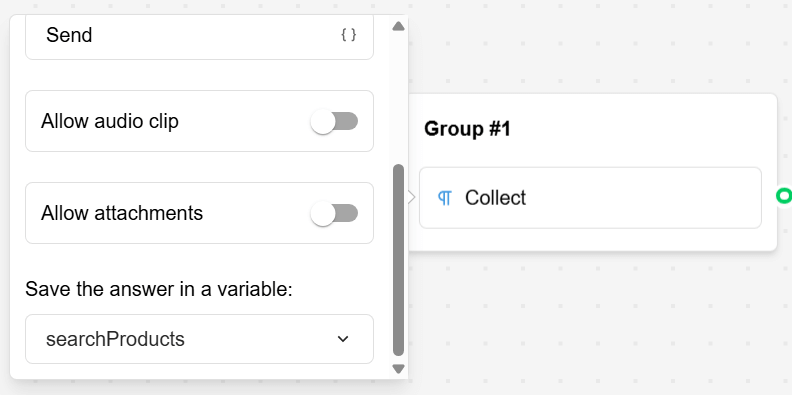
 2. Assign their respective variables in the **Save the answer in a variable** field.
 3. Add a **Text component** from the **Agent section** to your flow. Inside the message body, insert
the variable assigned in the Output Variable field from the WooCommerce block to display the
search result.
3. Add a **Text component** from the **Agent section** to your flow. Inside the message body, insert
the variable assigned in the Output Variable field from the WooCommerce block to display the
search result.
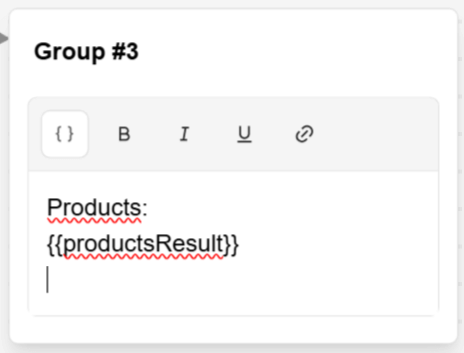 `Note: variables need to be inside "{{}}" in text inputs.`
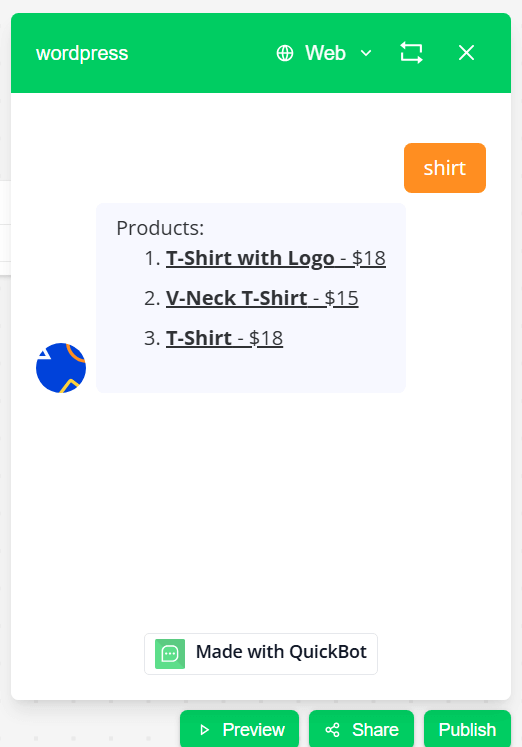
4. Lastly, anchor the User group with the Agent group. Your flow needs to look like this:
`Note: variables need to be inside "{{}}" in text inputs.`
4. Lastly, anchor the User group with the Agent group. Your flow needs to look like this:
 And this is how it looks like in the preview.
 ***
## Advanced Features
### Authentication & Security
* **OAuth 1.0a Authentication**: Secure API access using HMAC-SHA1 signature method
* **Encrypted Credentials**: Consumer keys and secrets stored with encryption
* **Read-only Access**: Recommended permissions for safe product data retrieval
* **SSL/HTTPS Support**: Secure connections to WooCommerce endpoints
### API Capabilities
#### Search Products Action
* **Text-based Search**: Search products by name, description, or SKU
* **Pagination Support**: Configure results per page (max 100 products)
* **Multiple Format Options**: List or detailed product display formats
* **Customizable Output**: Control price display and link inclusion
* **Variable Integration**: Output formatted text and structured data to variables
#### Get Product By ID Action
* **Direct Retrieval**: Fetch specific products using WooCommerce product IDs
* **Detailed Information**: Access complete product data including variations
* **Custom Formatting**: Control display format and included information
* **Error Handling**: Graceful handling of non-existent product IDs
### Data Processing
* **Product Formatting Service**: Automated formatting of product data for display
* **Link Generation**: Automatic conversion of permalinks to clickable links
* **Price Formatting**: Currency-aware price display with WooCommerce settings
* **Template System**: Reusable formatting templates for consistent presentation
### Performance Optimization
* **Connection Pooling**: Efficient API connection management
* **Request Optimization**: Optimized API calls to minimize response times
* **Error Recovery**: Automatic retry logic for transient failures
* **Rate Limiting**: Respect WooCommerce API rate limits
***
## Troubleshooting
### Common Issues
#### Authentication Problems
* **Invalid Consumer Key**: Verify the consumer key is correctly copied from WooCommerce
* **Invalid Consumer Secret**: Ensure the consumer secret matches the WooCommerce settings
* **Permission Denied**: Check that the API key has read permissions enabled
* **SSL Certificate Issues**: Verify SSL certificates are properly configured
#### API Connection Issues
* **Site URL Mismatch**: Ensure the site URL matches your WordPress installation
* **REST API Disabled**: Verify WooCommerce REST API is enabled
* **Firewall Blocking**: Check for firewall rules blocking API access
* **Plugin Conflicts**: Test for WordPress plugin conflicts affecting the API
#### Search and Data Issues
* **No Results Found**: Verify products exist and match search criteria
* **Incomplete Data**: Check product data completeness in WooCommerce
* **Format Issues**: Verify output format settings and variable configurations
* **Variable Not Set**: Ensure output variables are properly configured
#### Performance Issues
* **Slow Responses**: Check WooCommerce server performance and optimization
* **Timeout Errors**: Consider increasing timeout settings or optimizing queries
* **High Memory Usage**: Monitor memory usage with large product catalogs
* **Rate Limiting**: Implement proper rate limiting to avoid API throttling
### Debugging Steps
1. **Test API Directly**: Use tools like Postman to test WooCommerce API directly
2. **Check Server Logs**: Review WordPress and server error logs
3. **Validate Credentials**: Verify API credentials in WooCommerce settings
4. **Network Connectivity**: Test network connectivity between QuickBot and WooCommerce
5. **Product Data**: Verify product data exists and is properly configured
### Error Messages
* **"WooCommerce API credentials are not properly configured"**: Check consumer key and secret
* **"Required parameters are missing"**: Verify all required fields are filled
* **"Product not found"**: Check product ID exists and is published
* **"No products found"**: Verify search term matches existing products
* **"WooCommerce API Error"**: Check WooCommerce API status and configuration
***
## Advanced Features
### Authentication & Security
* **OAuth 1.0a Authentication**: Secure API access using HMAC-SHA1 signature method
* **Encrypted Credentials**: Consumer keys and secrets stored with encryption
* **Read-only Access**: Recommended permissions for safe product data retrieval
* **SSL/HTTPS Support**: Secure connections to WooCommerce endpoints
### API Capabilities
#### Search Products Action
* **Text-based Search**: Search products by name, description, or SKU
* **Pagination Support**: Configure results per page (max 100 products)
* **Multiple Format Options**: List or detailed product display formats
* **Customizable Output**: Control price display and link inclusion
* **Variable Integration**: Output formatted text and structured data to variables
#### Get Product By ID Action
* **Direct Retrieval**: Fetch specific products using WooCommerce product IDs
* **Detailed Information**: Access complete product data including variations
* **Custom Formatting**: Control display format and included information
* **Error Handling**: Graceful handling of non-existent product IDs
### Data Processing
* **Product Formatting Service**: Automated formatting of product data for display
* **Link Generation**: Automatic conversion of permalinks to clickable links
* **Price Formatting**: Currency-aware price display with WooCommerce settings
* **Template System**: Reusable formatting templates for consistent presentation
### Performance Optimization
* **Connection Pooling**: Efficient API connection management
* **Request Optimization**: Optimized API calls to minimize response times
* **Error Recovery**: Automatic retry logic for transient failures
* **Rate Limiting**: Respect WooCommerce API rate limits
***
## Troubleshooting
### Common Issues
#### Authentication Problems
* **Invalid Consumer Key**: Verify the consumer key is correctly copied from WooCommerce
* **Invalid Consumer Secret**: Ensure the consumer secret matches the WooCommerce settings
* **Permission Denied**: Check that the API key has read permissions enabled
* **SSL Certificate Issues**: Verify SSL certificates are properly configured
#### API Connection Issues
* **Site URL Mismatch**: Ensure the site URL matches your WordPress installation
* **REST API Disabled**: Verify WooCommerce REST API is enabled
* **Firewall Blocking**: Check for firewall rules blocking API access
* **Plugin Conflicts**: Test for WordPress plugin conflicts affecting the API
#### Search and Data Issues
* **No Results Found**: Verify products exist and match search criteria
* **Incomplete Data**: Check product data completeness in WooCommerce
* **Format Issues**: Verify output format settings and variable configurations
* **Variable Not Set**: Ensure output variables are properly configured
#### Performance Issues
* **Slow Responses**: Check WooCommerce server performance and optimization
* **Timeout Errors**: Consider increasing timeout settings or optimizing queries
* **High Memory Usage**: Monitor memory usage with large product catalogs
* **Rate Limiting**: Implement proper rate limiting to avoid API throttling
### Debugging Steps
1. **Test API Directly**: Use tools like Postman to test WooCommerce API directly
2. **Check Server Logs**: Review WordPress and server error logs
3. **Validate Credentials**: Verify API credentials in WooCommerce settings
4. **Network Connectivity**: Test network connectivity between QuickBot and WooCommerce
5. **Product Data**: Verify product data exists and is properly configured
### Error Messages
* **"WooCommerce API credentials are not properly configured"**: Check consumer key and secret
* **"Required parameters are missing"**: Verify all required fields are filled
* **"Product not found"**: Check product ID exists and is published
* **"No products found"**: Verify search term matches existing products
* **"WooCommerce API Error"**: Check WooCommerce API status and configuration