General
This block integrates with the WordPress REST API and miniOrange OAuth/OpenID Connect Server to provide comprehensive WordPress functionality. After authentication, you can create posts, manage users, and handle content dynamically to enhance user engagement and automate content workflows.Prerequisites
Before configuring the WordPress block, ensure your WordPress site is properly set up:1. WordPress Installation
Ensure you have:- A working WordPress installation (version 5.6 or higher)
- Administrator access to your WordPress dashboard
- HTTPS enabled on your WordPress site (recommended for secure connections)
2. Install miniOrange OAuth Plugin
- Navigate to Plugins > Add New in your WordPress dashboard.
- Search for miniOrange OAuth/OpenID Connect Server.
- Install and activate the plugin.
3. Configure OAuth Client
- In your WordPress dashboard, go to miniOrange OAuth Server > Configure your Application.
- Click Add Client to create new OAuth credentials.
- Configure the client settings:
- Client Name: Give it a descriptive name (e.g., “QuickBot Integration”)
- Redirect URI: Configure according to your QuickBot setup
- Grant Types: Select appropriate grant types for your use case
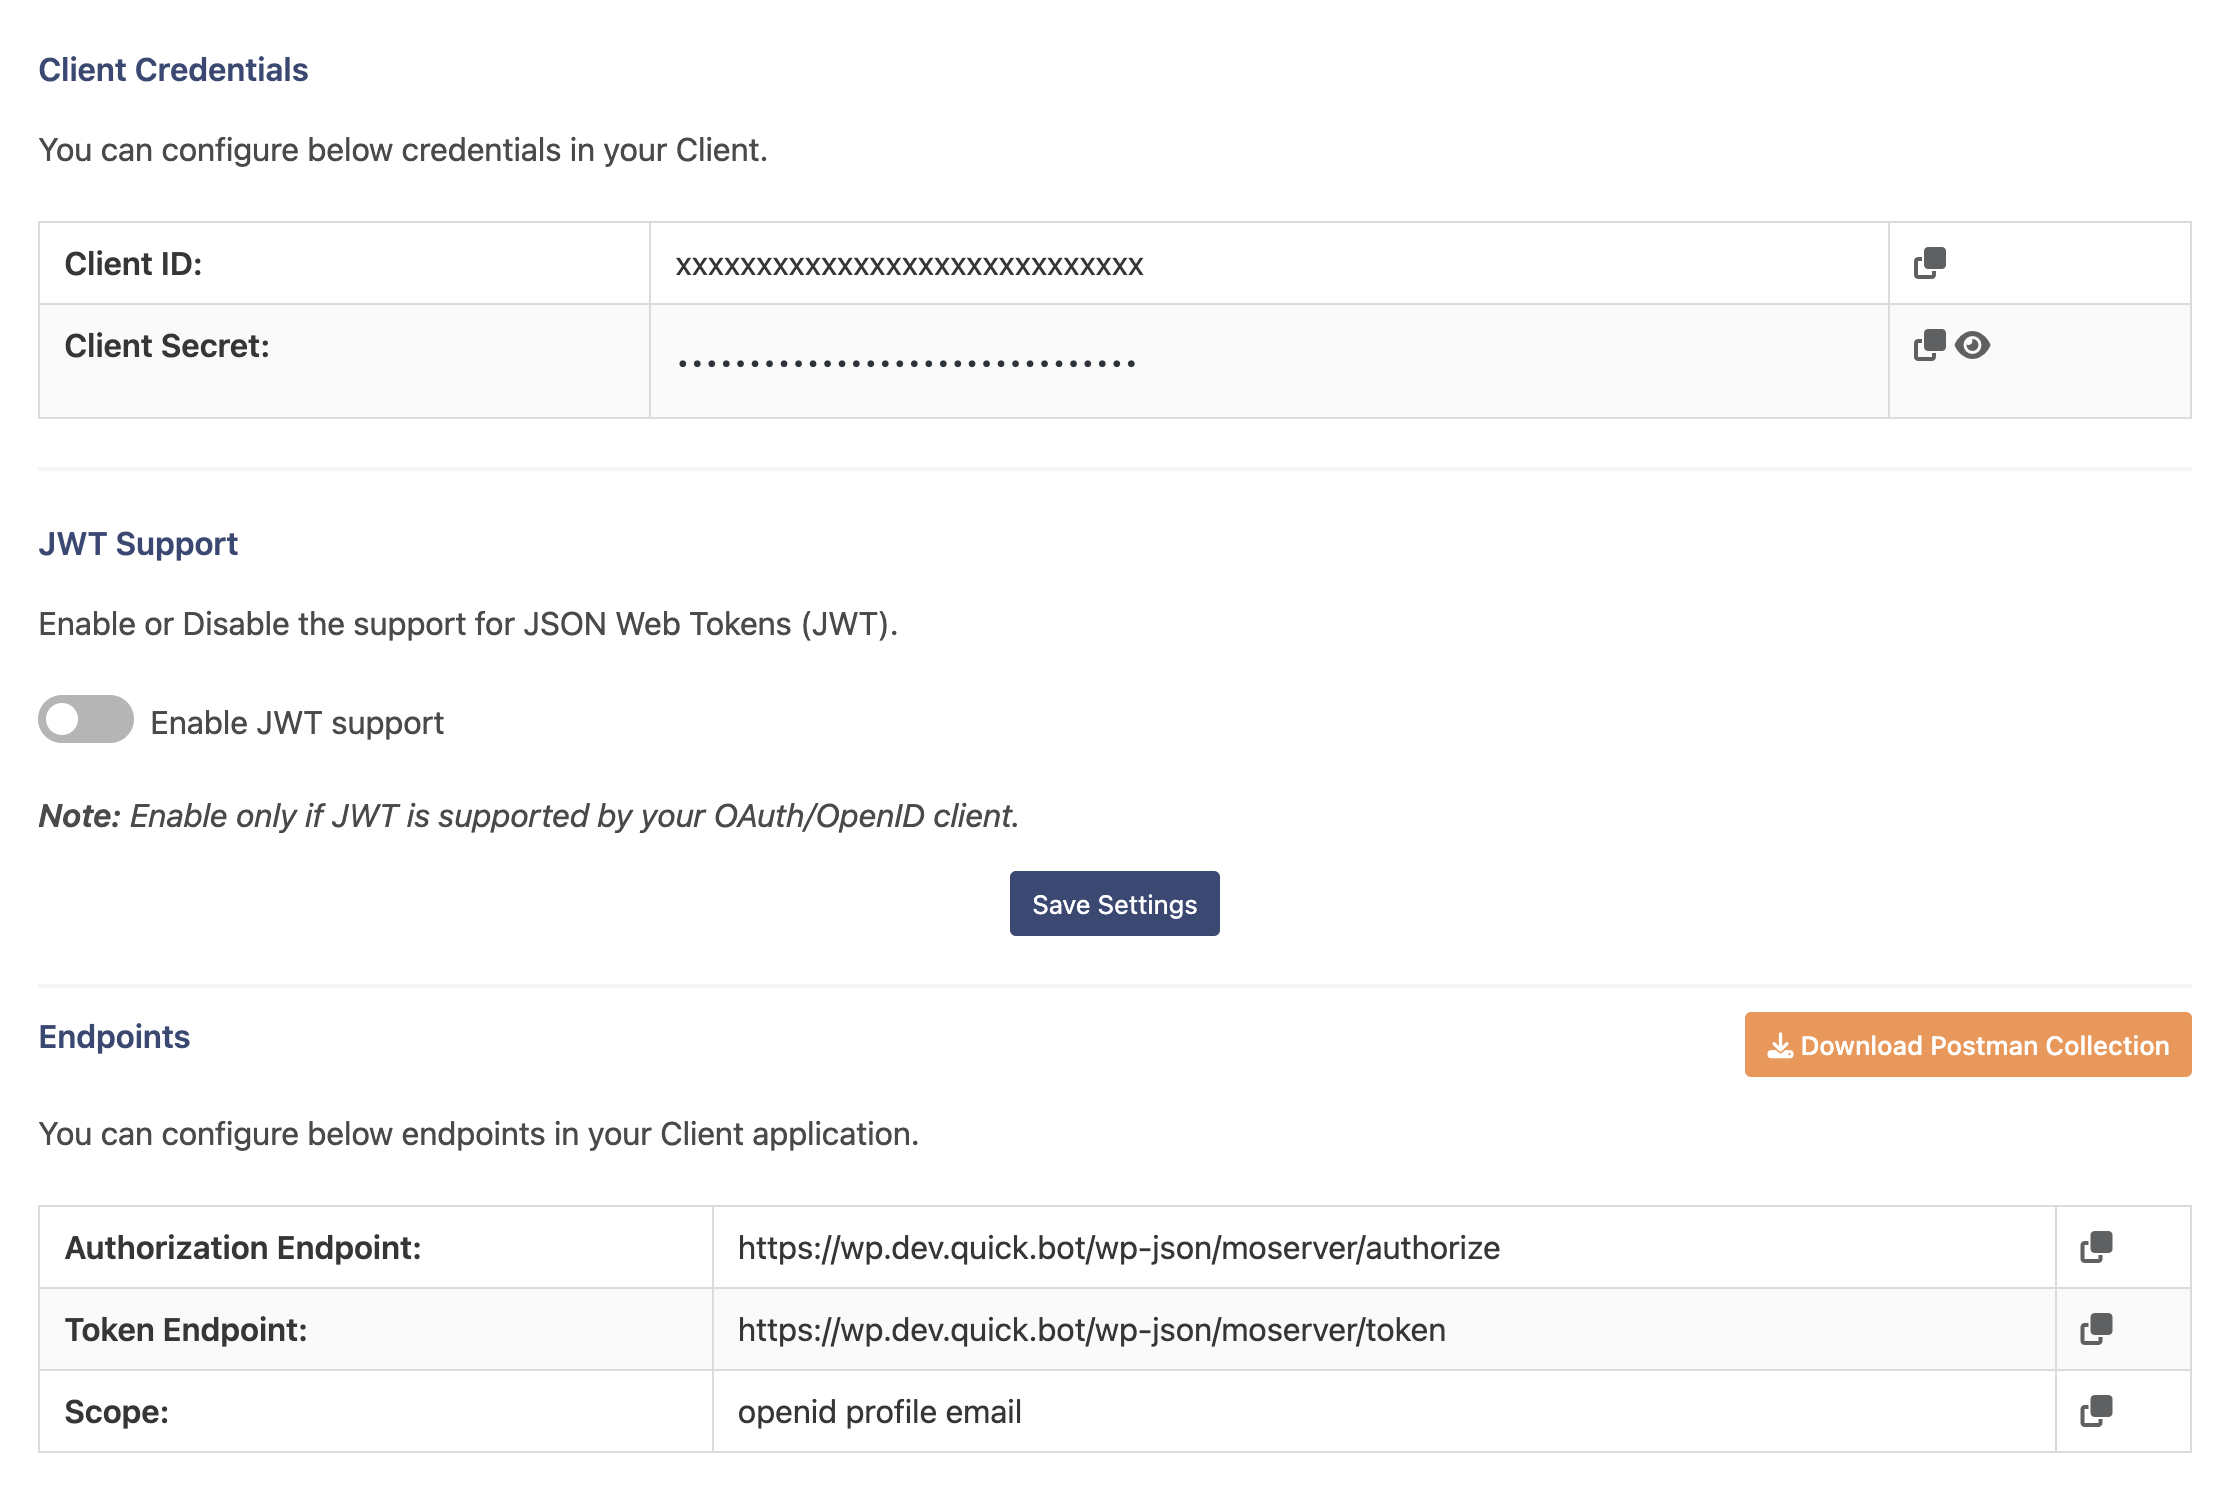
- After creating the client, copy the following credentials for later use:
- Client ID
- Client Secret
- Token Endpoint (usually
https://your-site.com/wp-json/moserver/token)
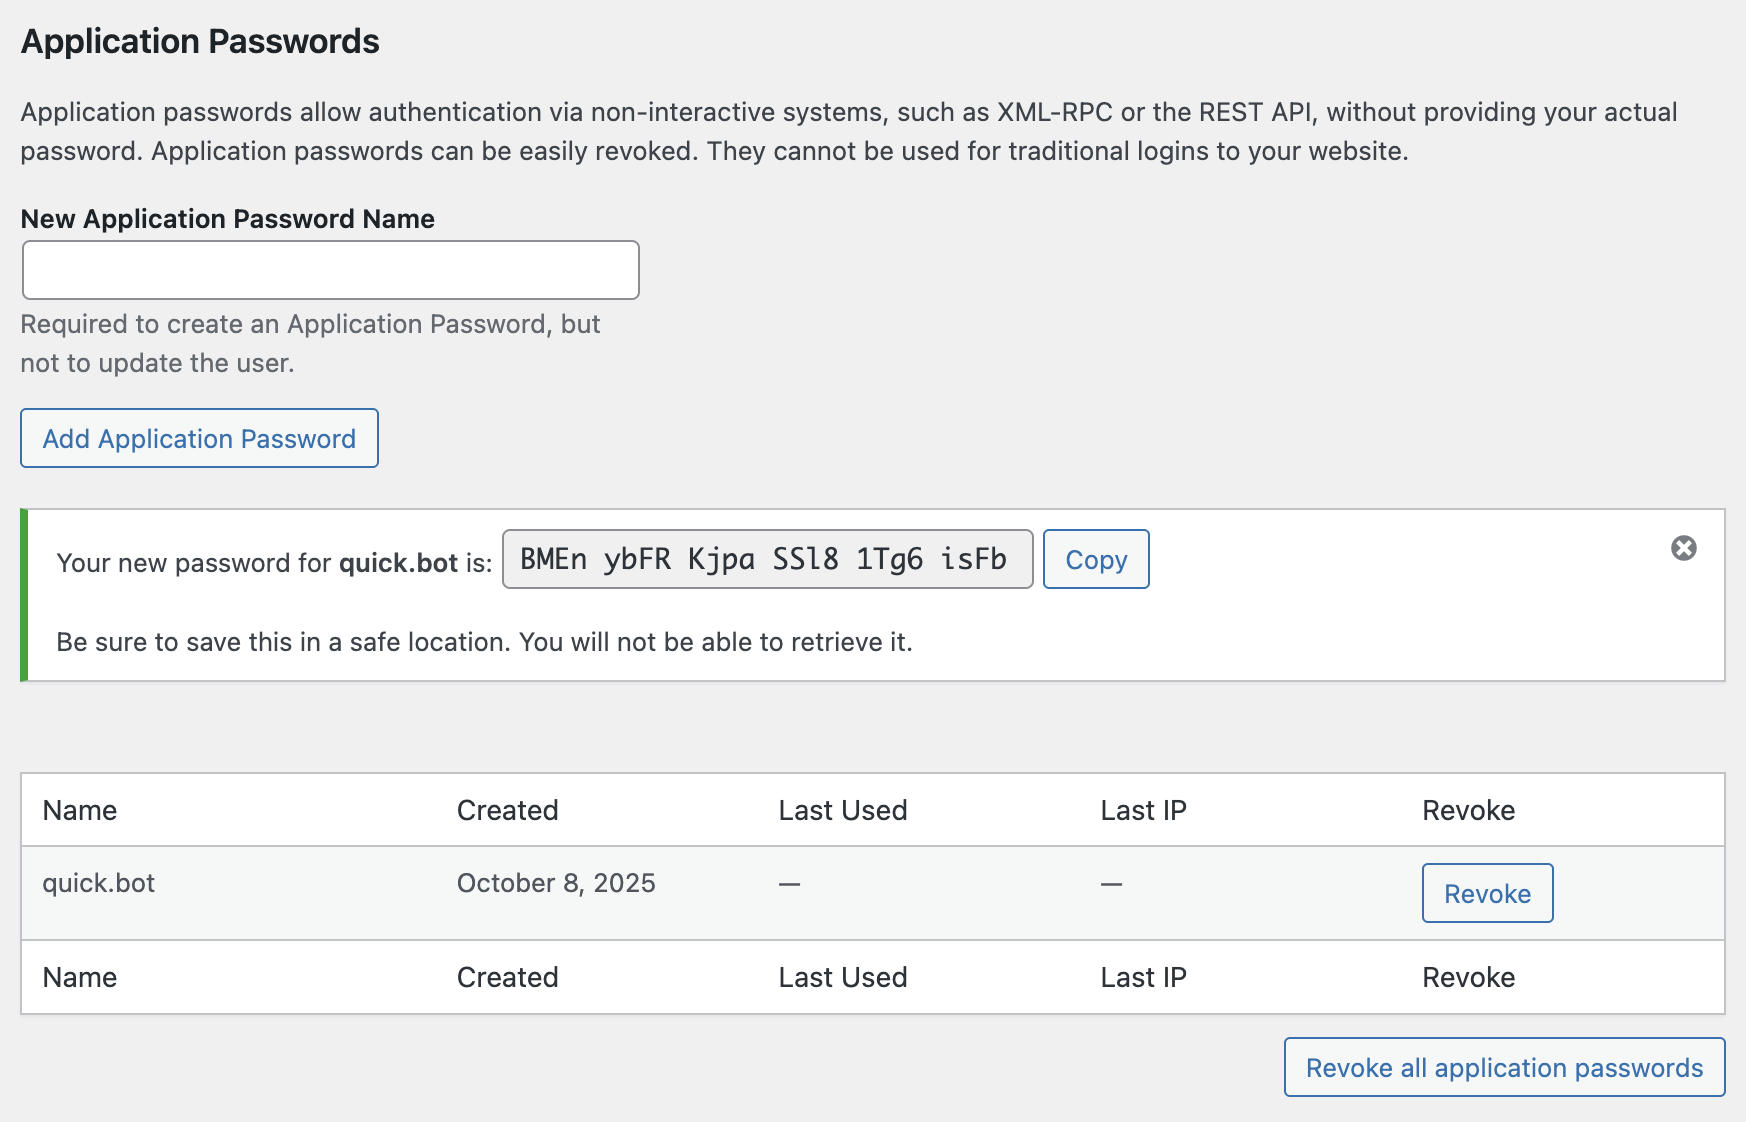
4. Generate Application Password
Application Passwords allow QuickBot to authenticate with WordPress REST API using the admin email without exposing the actual WordPress login password. The Application Password works together with the Admin Email to create a secure authentication pair. Steps to generate an Application Password:-
Log in to your WordPress site:
https://yoursite.com/wp-admin/ - Navigate to Users > Profile (or Users > Your Profile for your own account).
- Scroll down to the Application Passwords section (located near the bottom of the page).
-
In the New Application Password Name field, enter a descriptive name:
- Example:
quick.botorQuick.bot API - This helps you identify which application is using this password
- Example:
- Click Add Application Password.
-
WordPress will display a green notification banner with your generated password:
- Format:
BMEn ybFR Kjpa SS18 1Tg6 isFb(5 groups of 4 characters, 24 total) - The password is separated by spaces for readability
- A Copy button is provided for easy copying
- Format:
-
Copy the password immediately using the Copy button or by selecting the text.
- The message “Be sure to save this in a safe location. You will not be able to retrieve it.” will be displayed
- Once you leave or refresh the page, this password cannot be viewed again
-
The newly created password will appear in the table below showing:
- Name: The name you provided (e.g., “quick.bot”)
- Created: The date it was generated
- Last Used: When it was last used for authentication
- Last IP: The IP address of the last authentication
- Revoke: Button to revoke this password if needed
- The Application Password must be used together with the Admin Email address
- Format: WordPress displays the password with spaces (e.g.,
BMEn ybFR Kjpa SS18 1Tg6 isFb), but you can enter it with or without spaces - WordPress accepts both formats - If you lose the password, you cannot recover it. You must revoke it from the table and create a new one
- Store this password securely (e.g., in a password manager or QuickBot credentials storage)
- Each Application Password is unique and can be revoked independently from the Application Passwords table
- You can create multiple Application Passwords for different applications or purposes
- Username: Admin Email (e.g.,
admin@yoursite.com) - Password: Application Password (the generated key)
5. Verify Token Endpoint
To confirm your token endpoint:- Open the OpenID Discovery configuration URL:
https://your-site.com/wp-json/moserver/<CLIENT_ID>/.well-known/openid-configuration - Look for the
"token_endpoint"field and verify its value.
/wp-json/mo_oauth/token. Always use the endpoint shown
in the discovery document.
Configuring the WordPress Block
Required Configuration Fields
The WordPress Authentication block requires the following fields:1. Name
- An internal name to identify this connection within QuickBot
- Example:
My WordPress Account - This is user-defined and helps you organize multiple WordPress connections
2. Client ID
- The public OAuth client identifier generated by miniOrange
- Located in miniOrange OAuth Server > Configure your Application
- Copy from the Client ID field of your created client
3. Client Secret
- The secret key associated with the Client ID
- Located in the same client configuration under miniOrange OAuth Server
- Use the visibility toggle if the secret is hidden
4. Token Endpoint
- The URL where miniOrange provides OAuth tokens
- Standard format:
https://your-site.com/wp-json/moserver/token - Verify using the OpenID Discovery configuration document
5. Admin Email
- The administrator’s email address for WordPress operations
- This email is used as the username for REST API authentication (paired with Application Password)
- Found in Users > All Users (select admin user) or Settings > General > Administration Email Address
- Important: Use the email of the same user who generated the Application Password
- Consider using a dedicated admin email (e.g.,
bot-admin@yoursite.com)
6. Application Password
- An application password generated for the admin user specified in the Admin Email field
- Required for REST API authentication (creating users, posts, etc.)
- Generated from Users > Profile > Application Passwords section
- Must match the user whose email is specified in Admin Email field
- This password is used together with the Admin Email for Basic Authentication to WordPress REST API
- Format: 24-character string displayed with spaces (e.g.,
BMEn ybFR Kjpa SS18 1Tg6 isFb) - When entering in QuickBot: spaces are optional - both formats work
Configuration Summary
| Field | Source | Example |
|---|---|---|
| Name | User-defined | My WordPress Account |
| Client ID | miniOrange OAuth Server | gUPBxleDZ… |
| Client Secret | miniOrange OAuth Server | (encrypted) |
| Token Endpoint | OpenID Discovery or miniOrange settings | https://site.com/wp-json/moserver/token |
| Admin Email | WordPress admin user profile | admin@yoursite.com |
| Application Password | WordPress Application Passwords | BMEn ybFR Kjpa SS18 1Tg6 isFb |
Advanced Features
Authentication & Security
- OAuth 2.0 / OpenID Connect: Secure API access using industry-standard protocols
- Encrypted Credentials: Client secrets and application passwords stored with encryption
- Token Management: Automatic token refresh and expiration handling
- HTTPS Support: Secure connections to WordPress endpoints
- Application Passwords: Separate credentials for API access without exposing main password
API Capabilities
Content Management
- Post Creation: Create and publish posts programmatically
- Post Updates: Modify existing post content and metadata
- Custom Fields: Support for custom post fields and meta data
- Media Management: Upload and attach media to posts
- Taxonomy Support: Handle categories, tags, and custom taxonomies
User Management
- User Registration: Create new WordPress user accounts
- Profile Updates: Modify user profile information
- Role Assignment: Assign and manage user roles
- Authentication: Verify user credentials and manage sessions
Integration Features
- REST API Access: Full access to WordPress REST API endpoints
- Custom Endpoints: Support for custom REST API routes
- Webhook Support: Trigger actions based on WordPress events
- Variable Integration: Pass data between QuickBot and WordPress seamlessly
Best Practices
Implementation Recommendations
- Security First: Always use HTTPS for WordPress connections
- Dedicated Credentials: Create separate application passwords for QuickBot
- Minimal Permissions: Grant only necessary permissions to API clients
- Error Handling: Implement fallback messages for failed API calls
- Testing: Test thoroughly in a staging environment before production
Security Best Practices
- Credential Protection: Never expose client secrets or application passwords
- HTTPS Only: Always use HTTPS endpoints for API calls
- Regular Rotation: Periodically rotate application passwords
- Access Control: Limit OAuth client permissions to required operations
- Monitoring: Monitor API usage for unusual patterns or security issues
- Plugin Updates: Keep miniOrange and WordPress core updated
Performance Guidelines
- Efficient API Calls: Minimize unnecessary WordPress API requests
- Caching Strategy: Consider caching frequently accessed content
- Batch Operations: Group multiple operations when possible
- Connection Management: Reuse authenticated connections efficiently
User Experience Guidelines
- Loading States: Provide feedback during WordPress operations
- Error Messages: Show user-friendly error messages
- Validation: Validate user input before sending to WordPress
- Confirmation: Confirm successful operations to users
Troubleshooting
Common Issues
Authentication Problems
- Invalid Client ID: Verify the client ID is correctly copied from miniOrange
- Invalid Client Secret: Ensure the client secret matches the miniOrange settings
- Token Endpoint Error: Verify the token endpoint URL is correct
- Application Password Invalid: Check that the application password is active and correctly copied (24 characters with or without spaces). Verify it hasn’t been revoked in the Application Passwords table
- Admin Email Mismatch: Ensure the Admin Email matches the user who created the Application Password
- SSL Certificate Issues: Verify SSL certificates are properly configured
API Connection Issues
- Site URL Mismatch: Ensure the site URL matches your WordPress installation
- REST API Disabled: Verify WordPress REST API is enabled
- Plugin Conflicts: Test for WordPress plugin conflicts affecting the API
- Firewall Blocking: Check for firewall rules blocking API access
- CORS Issues: Configure CORS settings if accessing from different domains
WordPress Operation Issues
- Permission Denied: Verify the user has appropriate WordPress capabilities
- Post Creation Failed: Check required fields and post status settings
- User Registration Blocked: Verify user registration is enabled in WordPress settings
- Media Upload Failed: Check file upload permissions and size limits
- Invalid Credentials: Verify admin email and application password are correct and belong to the same user account. Check that the password hasn’t been revoked
Configuration Issues
- miniOrange Not Configured: Ensure miniOrange plugin is properly set up
- Missing Client: Verify OAuth client exists in miniOrange settings
- Invalid Token Endpoint: Check token endpoint URL format and accessibility
- Expired or Revoked Password: Check the Application Passwords table in WordPress - if the password was revoked or doesn’t exist, generate a new one
- Wrong User Password: Ensure you’re using the Application Password from the same user account whose email is configured in Admin Email field
Debugging Steps
- Test OAuth Flow: Verify OAuth authentication works independently
- Check WordPress Logs: Review WordPress error logs for API errors
- Validate Credentials: Confirm all credentials in miniOrange and WordPress settings
- Verify Application Password:
- Check the Application Passwords table in Users > Profile
- Ensure the password exists and hasn’t been revoked
- Verify the Admin Email matches the user who owns the Application Password
- Test REST API: Use tools like Postman to test WordPress REST API directly with the Admin Email and Application Password
- Network Connectivity: Test network connectivity between QuickBot and WordPress
- Plugin Status: Verify miniOrange plugin is active and up to date
Error Messages
- “WordPress API credentials are not properly configured”: Check all required fields are filled correctly. Verify Admin Email and Application Password match the same user
- “Invalid token endpoint”: Verify token endpoint URL is accessible and correctly formatted
- “Authentication failed”: Check client ID, client secret, admin email, and application password. Verify the Application Password hasn’t been revoked
- “Invalid Application Password”: The password may be incorrect, revoked, or doesn’t match the Admin Email. Generate a new password or verify the correct pairing
- “Permission denied”: Verify user has required WordPress capabilities for the attempted operation
- “WordPress API Error”: Check WordPress API status and configuration
- “User already exists”: Handle duplicate user registration attempts appropriately
- “REST API disabled”: Verify WordPress REST API is enabled in WordPress settings
Additional Resources
For more information about WordPress REST API and miniOrange OAuth:- WordPress REST API Handbook: https://developer.wordpress.org/rest-api/
- miniOrange OAuth Documentation: Available in plugin settings
- WordPress Application Passwords: https://make.wordpress.org/core/2020/11/05/application-passwords-integration-guide/